
文章目录
- 首先我们在用户资料编辑页面添加一行“微信号码” 的自定义字段。直接把下面的代码复制到主题的functions.php文件中,即可在用户资料编辑页面看到一个“QQ号码”的表单项。
add_action( ‘show_user_profile’, ‘wizhi_extra_user_profile_fields’ );
add_action( ‘edit_user_profile’, ‘wizhi_extra_user_profile_fields’ );
add_action( ‘personal_options_update’, ‘wizhi_save_extra_user_profile_fields’ );
add_action( ‘edit_user_profile_update’, ‘wizhi_save_extra_user_profile_fields’ );function wizhi_save_extra_user_profile_fields( $user_id ){
if ( !current_user_can( ‘edit_user’, $user_id ) ) { return false; }
update_user_meta( $user_id, ‘wx_username’, $_POST[‘wx_username’] );
}function wizhi_extra_user_profile_fields( $user ){ ?>
附加用户字段
<input type="text" id="wx_username" name="wx_username" size="20" value="ID )); ?>”>
请输入微博用户名。 - 添加好了用户自定义字段后,改如何获取使用这个字段呢,获取的方法也很简单,示例代码如下:
ID, ‘wx_username’, true);
?>今天的wordpress教程对您有没有一些帮助呢?如果有的话请分享给其他需要的朋友。
文章来自小白学习资源站https://qyymz.com转载请保留本链接,谢谢!
在我们进行WordPress前端用户中心功能开发的时候,经常会需要一些自定义字段来实现我们的需求,很多的插件可以实现我们的需求,今天小白学习资源站分享的是免插件实现添加用户自定义字段(user_meta)到用户资料的教程。
今天我们来看一下怎么通过代码免插件实现添加用户自定义字段。
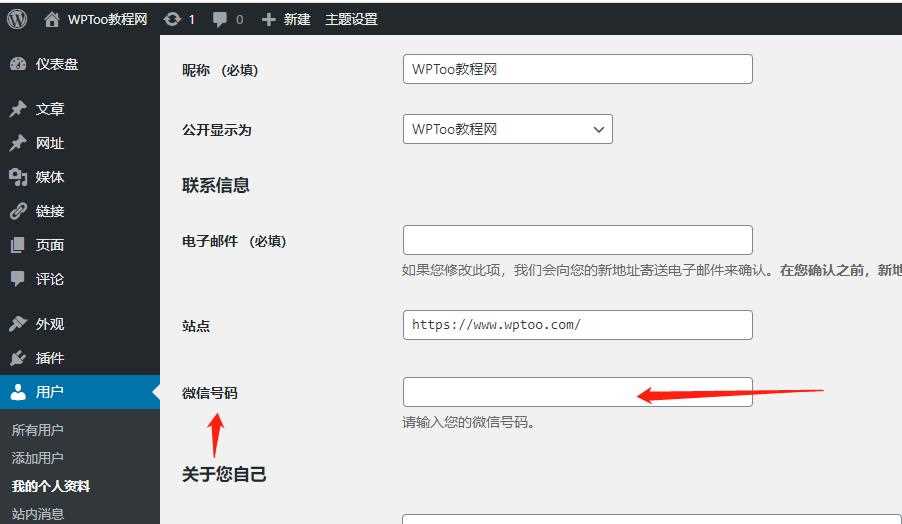
首先我们在用户资料编辑页面添加一行“微信号码” 的自定义字段。直接把下面的代码复制到主题的functions.php文件中,即可在用户资料编辑页面看到一个“QQ号码”的表单项。
add_action( 'show_user_profile', 'wizhi_extra_user_profile_fields' );
add_action( 'edit_user_profile', 'wizhi_extra_user_profile_fields' );
add_action( 'personal_options_update', 'wizhi_save_extra_user_profile_fields' );
add_action( 'edit_user_profile_update', 'wizhi_save_extra_user_profile_fields' );
function wizhi_save_extra_user_profile_fields( $user_id ){
if ( !current_user_can( 'edit_user', $user_id ) ) { return false; }
update_user_meta( $user_id, 'wx_username', $_POST['wx_username'] );
}
function wizhi_extra_user_profile_fields( $user ){ ?>
附加用户字段
<input type="text" id="wx_username" name="wx_username" size="20" value="ID )); ?>">
请输入微博用户名。
添加好了用户自定义字段后,改如何获取使用这个字段呢,获取的方法也很简单,示例代码如下:
ID, 'wx_username', true);
?>
今天的wordpress教程对您有没有一些帮助呢?如果有的话请分享给其他需要的朋友。
文章来自小白学习资源站https://qyymz.com转载请保留本链接,谢谢!
声明:本站所有文章,如无特殊说明或标注,均为本站原创发布。任何个人或组织,在未征得本站同意时,禁止复制、盗用、采集、发布本站内容到任何网站、书籍等各类媒体平台。如若本站内容侵犯了原著者的合法权益,可联系我们进行处理。


